


DIY Mods: Safe Customisation for Realism or Fantasy
(Piercings, Painting, and Other Doll Enhancements You Can Totally Handle)
At some point in every doll owner’s journey, you look at her and think:
“She’s perfect… but what if she had a nose ring?”
“Could I give her freckles?”
“How hard is it to pierce her ears or tint her nipples a bit more pink?”
Welcome to the world of DIY mods—tiny customizations that take your doll from gorgeous to one-of-a-kind. Whether you’re going for hyper-realism, fantasy cosplay, or just more personality, this guide will walk you through the safe, smart way to mod your doll.
⚠️ Before You Start: Know Her Material
Is your doll made of TPE or silicone? This changes how you work with her skin.
-
TPE (Thermoplastic Elastomer) is softer and more porous—great for blending, but not compatible with silicone-based adhesives or paint.
-
Silicone is tougher, holds shape better, and resists stains—but requires silicone-safe materials only.
Know your material before applying anything permanent.
✨ Mod 1: Ear Piercing
Easy, stylish, and low-risk.
What You Need:
-
A pin, pushpin, or sterile earring needle
-
Alcohol swab
-
Lightweight stud or ring (clip-on or magnetic if you want to skip the hole)
How-To:
-
Mark the spot with eyeliner or pencil
-
Gently push the needle straight through (TPE will seal a bit; silicone won’t)
-
Insert a small stud or hoop—nothing too heavy!
🧠 Tip: Magnetic earrings are a great option if you’re hesitant to pierce.
🎨 Mod 2: Body Painting (Blush, Nipples, Veins, Freckles)
You’d be amazed what a little color does for realism.
Safe Supplies:
-
Oil-free blush or matte makeup for temporary color
-
TPE pigment cream or silicone-safe paint for semi-permanent modding
-
Soft makeup brushes, Q-tips, and sponges
Where to Add:
-
Nipples
-
Lips
-
Elbows/knees (light blush for realism)
-
Collarbone & cheeks
-
Freckles across the nose or chest
💡 Lock it in with a sealant only if your product is compatible with her material.
✂️ Mod 3: Haircuts or Wig Restyling
Wigs are super mod-friendly. If you’ve got a steady hand, try:
-
Trimming bangs
-
Creating layers
-
Adding braids, buns, or waves
-
Using fabric softener to de-frizz
🛑 Never cut implanted hair on silicone heads unless you really know what you’re doing—it doesn’t grow back!
🔥 Mod 4: Adding Texture or Tattoos
Veins, tattoos, or beauty marks?
Use:
-
Temporary tattoos (press-on works on TPE and silicone)
-
Body-safe paint pens for tiny details
-
Embossing with a heated tool (for expert-level realism only)
🚫 Avoid real ink, stickers with heavy adhesive, or anything untested—some reactions can discolor her skin permanently.
🔧 Mod 5: Body Mods (Advanced Users Only)
We’re talking about:
-
Reinserting finger wires
-
Tightening joints manually
-
Opening seams to install heating or sound modules
-
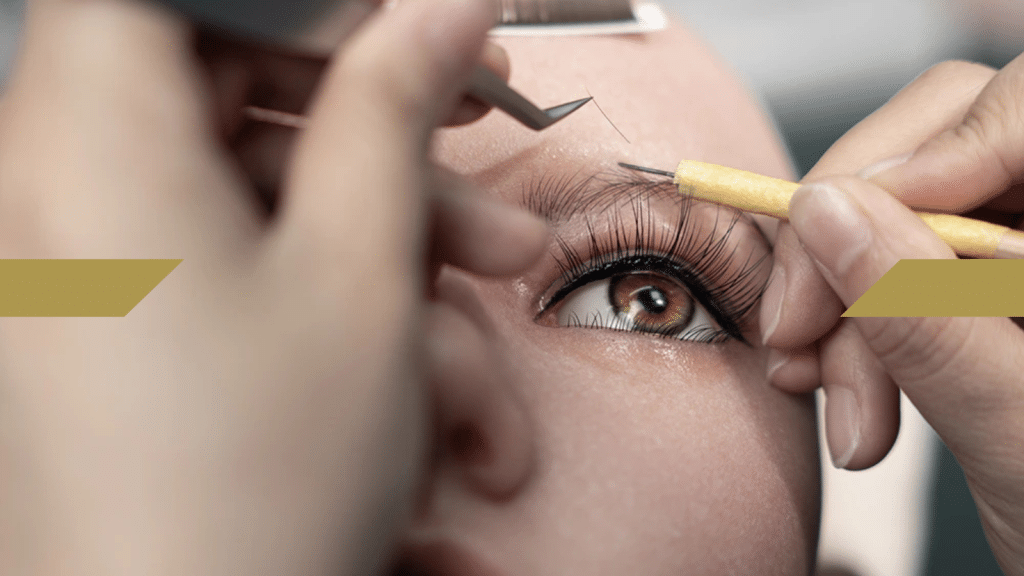
Implanting eyelashes, if yours fall out
This level of modding requires:
-
Patience
-
Surgical precision
-
Willingness to potentially void return options or damage the doll
🧠 Join online forums or watch demo videos before trying anything surgical.
🧼 Safety Rules for All Mods
-
Test any pigment or glue on a hidden spot first
-
Clean the area thoroughly before and after
-
Always use tools designed for soft skin or dolls
-
Take before-and-after photos—you might love the original more than you think!
🧡 Final Thoughts: From Doll to Muse
Modding isn’t just about looks—it’s about expression. It’s a way to bring out her personality, explore your creativity, and make her feel less like a product and more like a partner in your story.
Take it slow. Try small things. And remember: it’s your doll. Your rules.