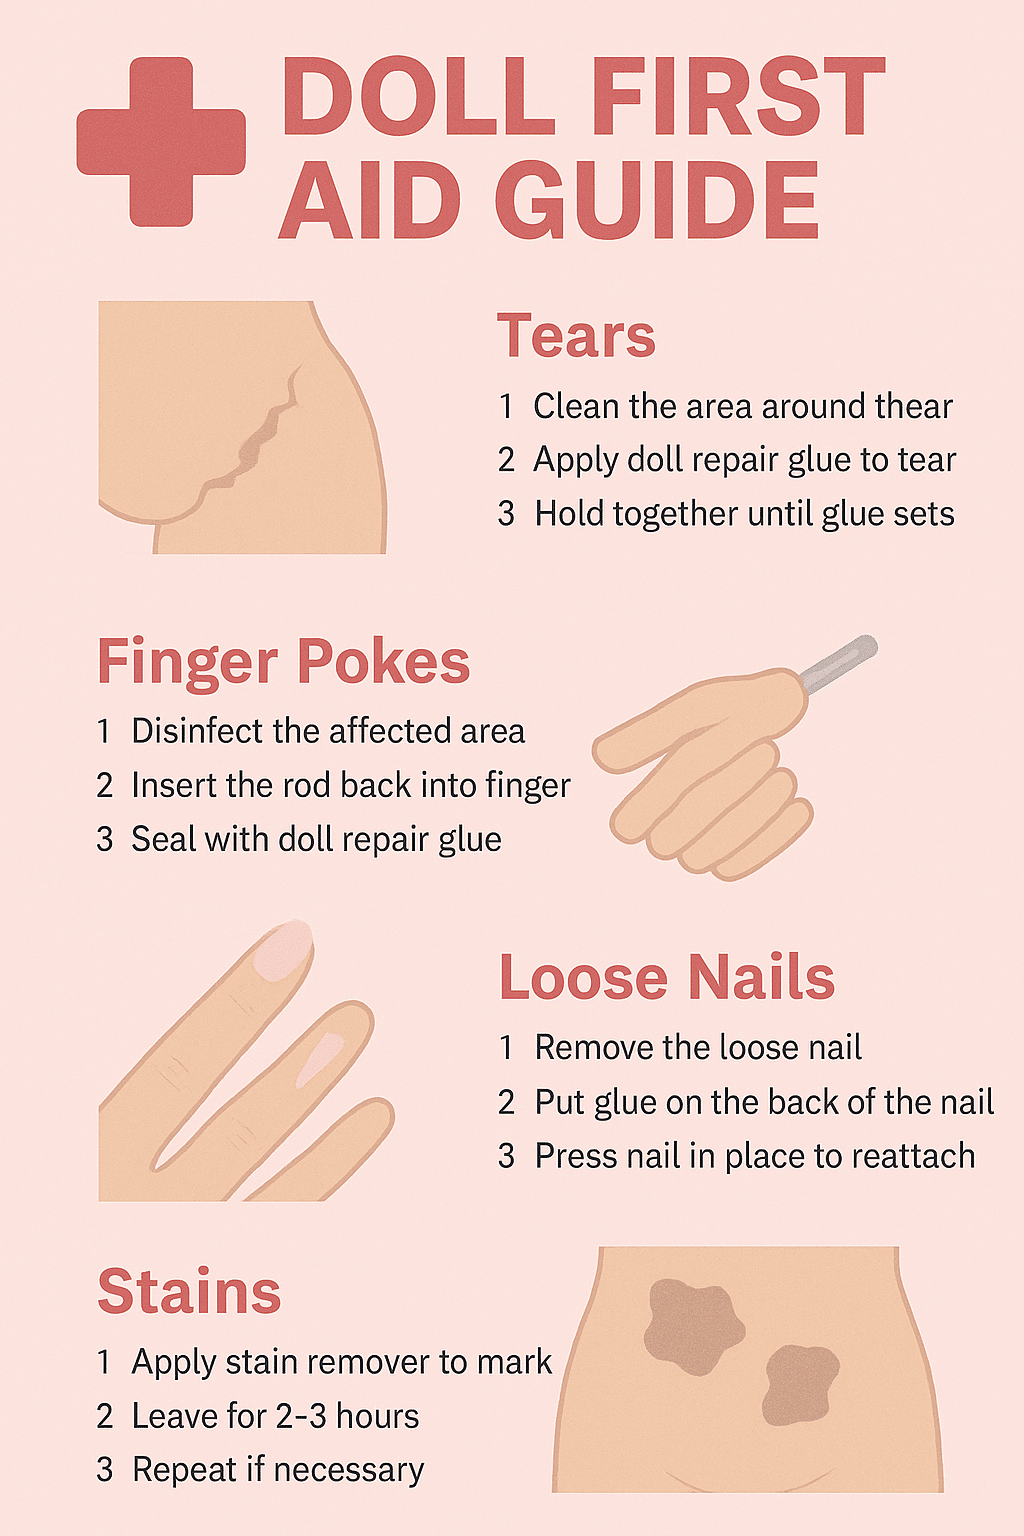


💔 Help! I Think I Broke Her
You’re posing her, cleaning her, maybe getting a little frisky—and then you notice something. A tear. A loose limb. A dent that wasn’t there before.
“Did I just break her?”
Take a breath. You’re not alone.
Doll damage is surprisingly common, especially for new owners—and 95% of the time, it’s completely fixable with a little patience, the right tools, and a steady hand.
Let’s walk through the most common doll issues and how to handle them like a pro (or at least like someone who doesn’t panic-Google at midnight).
🚨 Common Types of Doll Damage (and What You Can Do)
🕳️ 1. Small Tears or Splits
Where you’ll see them:
-
Armpits
-
Vagina/anus entry points
-
Elbows or knees
-
Between fingers or toes
These areas flex and stretch often—so small tears can happen over time or with a sudden tug.
How to fix it:
-
For TPE dolls, use TPE repair glue or petroleum jelly to soften and blend the area
-
For silicone dolls, use silicone adhesive or medical-grade silicone glue
-
Always clean the area first and apply with precision
🧼 Pro tip: A cotton swab and steady hands go a long way. Less is more when using glue.
🔩 2. Loose or Floppy Joints
If her limbs won’t hold a pose like they used to, she may have:
-
A loosened internal hinge
-
A worn joint from frequent repositioning
How to manage it:
-
Adjust posing to rely on stronger joints
-
Pose with cushions or props to support her
-
If you’re comfortable with DIY work, some joints can be accessed and tightened—but this often involves a careful incision
🛑 Tip: If you’re not into “doll surgery,” it’s okay to live with a floppy limb—many owners do and work around it.
🎨 3. Skin Stains from Clothes or Wigs
TPE and silicone are absorbent—meaning dark clothing and wigs can leave stains.
How to fix it:
-
Use a stain remover paste or cream (some acne creams with 10% benzoyl peroxide work well)
-
Apply a thin layer to the stained area
-
Let sit for 6–12 hours in a cool, dry place
-
Wipe gently and repeat if needed
👕 Prevention tip: Wash dark clothing before dressing your doll—or go for light-colored, doll-friendly fabrics.
🔥 4. Heat Damage or Melting
This happens when dolls are left:
-
In direct sun
-
Near heaters
-
On electric blankets
Signs include surface warping or shiny, sticky patches.
How to fix it:
-
Light sanding with a fine sanding sponge can help smooth minor melted areas
-
For TPE: gentle massage with baby oil may help restore texture
-
For silicone: trim and smooth any affected edges with care
🧰 Your Essential Doll Repair Kit
Every doll owner should keep a simple repair setup:
-
TPE or silicone glue (depending on your doll’s material)
-
Cotton swabs & tweezers
-
Petroleum jelly (for blending TPE)
-
Baby oil or mineral oil
-
Soft cloths & powder brush
-
Cornstarch or renewal powder
-
Optional: stain remover cream, heat wand, fine grit sanding sponge
🙌 It’s Okay—Really
A small tear doesn’t mean the end of the world. A loose wrist doesn’t make her any less beautiful. Most issues can be fixed—or at least worked around.
And just like with people, your doll may pick up a few imperfections over time. They add character, experience, and a little story behind every scar.
🧡 Final Thoughts: You Didn’t Break Her. You’re Learning.
Doll care is like anything intimate—it takes practice. And when something goes wrong, it’s not failure. It’s just a reminder to slow down, care deeply, and learn as you go.
So grab that cotton swab, take a breath, and fix her up. You’ve got this.